Sunday, December 29, 2013

Christmas Presents

I was thrilled to bits with two of the Christmas presents I received from my family this one.  This first one was from Mum and she picks one gift and buys it for her four daughters however this year she bought it for her 3 Brisbane daughters and picked another gift for my sister in Perth.  It is a Cheese Making kit which you can make 6 varieties and it makes up to 6kgs of Cheese.  This is a fantastic present and the funny thing was when Karin and I did our preserving course they had Cheese Making Kits and I was going to ask Mum if she could buy me one for Christmas but that would involve me buying it, her paying me the money back which isn't the best way for a gift so I didn't say anything.  I was very surprized when I opened the gift and my two other sisters who are not really into simply living were thrilled to bits with it as well.  When my sister in Perth heard about the gift we got she said she would have loved the same thing.  Mum knows my sister in Perth is very busy and didn't think she would have time to be making cheese however you just never know.

Here's me holding the Cheese Making Kit from Mum.

My sister Lisa gave me the River Cottage Australia DVD and it was one of those gifts where I bought it myself to watch and then thought it would be a great present for Lisa to give me as she is always asking me what she should buy me for Christmas.  It was one of those things, I traded her the DVD for the $$ about a month ago and then on Christmas Day she gave me my present.

The kids and I have been watching 2 shows each time and have finished watching the two DVD's which we all loved.  On the first show Paul West (the Tassi Chef who is the River Cottage Australia guy) made a Sourdough Starter so James is keen to make one and it's been on my "to do list" for a while so we will do that while we are on holidays.

The show is filmed in a little town called Tilba about 5 hours out of Sydney and approximately 12 kms (don't quote me on that) from the ocean so they have the best of both worlds.


If you haven't watched the River Cottage Australia I suggest you do.  I love all the community spirit and competitions like pumpkin scone making etc. and a working bee to repaint the CWA building that they did.  The scenery on the property is stunning and the photography is great.  We have finished watching all 8 shows now but will certainly be rewatching it as these shows inspire you to get back to nature and plant your veggies.  We won't be having any cows in my suburban backyard but it did remind me I should be making more butter instead of buying it.   I hope you all had a lovely Christmas and I certainly have eaten way too much food and am just about to go and have some more Christmas ham with my family.  Back to healthy eating on the 1st January, 2014 in this household and looking forward to it.

Thursday, December 19, 2013

Home Made Yoghurt

I have been wanting to make Home Made Yoghurt for the kids for a long time but have never gotten around to doing it.  I have a Thermomix and apparently it' pretty easy to make.  You can also buy a $20 yoghurt maker from the supermarket however I didn't want another gadget in my cupboard and besides that, I have a Thermomix.  So today was the day I was trying it for the first time and after reading instructions on Simone's blog it was time to get started.  The Thermomix Recipe Book also has instructions however, I just went with the wonderful post on Simone's blog.


Basically it's one litre of milk and 50 gms of milk powder and into the Thermomix for 30 mins cooking time and then the jug with it's contents goes into the fridge to cool down to 37 degrees which is the setting temperature for yoghurt.  Simone's instructions said around 40 mins but if it's not at the right temperature just put it back in the fridge for another 15 minutes and check again.  Mine took that and a bit more however eventually it got down to 37 degrees and then I had to add the 3 tablespoons of natural set yoghurt (I used Farmers Union yoghurt as that's what they had at the supermarket) and then it cooks for another 10 minutes and then it's done.

While it was cooking for 10 minutes I warmed up my "Thermo Serving Bowl" with hot water and once the yoghurt was ready I tipped out the hot water from the server and poured the yoghurt liquid into the bowl, put the lid on and wrapped it up nice and cozy in a beach towel.  Our Elf on the Shelf was guarding it nicely all day for us.  In 6 hours and up to 24 hrs it stays wrapped up and the longer you leave it the thicker it gets.  Ours was left for 8.5 hrs and it looked great.  I don't eat yoghurt myself but the kids do and I know how beneficial it is for them.

You are supposed to reserve 3 tablespoons of the yoghurt as your starter for the next batch of yoghurt which I fully intended to do however I got carried away and added the berries and mixed it together before I realized I got side-tracked and forgot to do it.  Simone says that each time you save the starter and make a new batch the yoghurt is thicker and creamier the next time around so I'm planning to do that with the next batch.  The yoghurt is mixed with the raspberries and is in the fridge for the kids to have some at breakfast time.

As this was my first time and I was inexperienced it always takes you a little longer reading instructions, getting the temperature just right etc. but now I've made it once it's so easy to do and I'll know what to expect next time we'll be making regular yoghurt in this household for sure.  I'm so loving these new things I am making time to try out.  This is Happiness.  If you haven't make yoghurt before I'd give it a go even if you don't have a thermomix you could still make it on the stove and I'm sure "Mr Google" could help you in a nano second.  It beats paying $5.50 for yoghurt from the supermarket now I know how to make my own.  My sister recently purchased the $20 from the supermarket and has the sachets which is great for her and an easy option because it stays overnight in the container you mix it in but there are more ways to make it than just these two I would say.  Find what suits you best and get to and make your own yoghurt.  Who would have thought I would have been making yoghurt.  I don't eat yoghurt so I didn't even taste it however both kids gave it the thumbs up. 


This is boiled water from the kettle which was pre-warming the bowl.

The yoghurt liquid now in the bowl.

The bowl with it's lid on was then wrapped up in a towel and set to do it's thing for 8.5 hrs.  The Elf was keeping guard so no one touched or moved it while it set.

Hey Presto.....we've made yoghurt.

I put some raspberries on top of the yoghurt to be mixed in.

That's what I call "Christmas Yoghurt" with some twinkle in the background.

Sunday, December 15, 2013

Slow Living Essentials - September to December

Linking up with Christine at Slow Living Essentials to do a recap of the past 3 months of slow living.  It does seem anything but slow but thoroughly enjoyable learning some new skills. These are a bit out of order and I've combined a few headings as they cover both topics.

{DISCOVER & GREEN}
I discovered that things I had thought appeared too difficult were actually easy and very enjoyable.

I made soap for the very first time which you can read about here.

I made washing powder for the very first time which you can read about here.

Sienna and I made Vanilla Essence for the very first time which you can read about here.

I did a course in "Preserving" which you can read about here.


{NOURISH & PREPARE}
I made a few new recipes and our favourites were Rhonda's Muffins from her Down to Earth Book and my Mother-in-Law's "Apple Slice" recipe.


I made some lemonade and foccacia bread for the hard workers weeding the garden in the post below.


{GROW}
Well the only thing I have been growing lately was weeds so while Pop was up from Melbourne he and Sienna got stuck into the veggie garden and weeded it and planted corn, carrotts, lettuce, capsicum, schallots and cucumbers.  The photo at the bottom is 2 weeks growth of the seeds, pretty good.


{REDUCE}
I have taken a few bags to the Salvos however this is still just the tip of the iceberg in this household and in 2014 I am going to get really serious to declutter the entire house room to room.  It does require a bit of an action plan and am wanting to ebay things so I can get some pocket money from those years of spending.  I have craft kits galore which have been unopened.  Cross stitch patterns, patchwork kits etc. which I have paid good money for and are sitting in boxes in my garage.

{CREATE}
I can't think of anything that I have created however I did participate in Ali Edwards "Week in the Life" Photography project which I have done for the past five years.  Basically you document how your life is for a period of 7 days.  Similar to a "photo a day" but it's all day and everything.  It's exhausting but such a worth while project.  I have done the hard work taking the photos and documenting our life for 7 days in September, now I need to spend time uploading them into a Blurb Photo Book over this holiday period.  My Week in the Life Book from 2012 can be seen here.

{ENHANCE}
I volunteered my time to take photos of Sienna's grade 2 class for their Christmas Craft Activities.  Each child was going to make a little frame for their photo and give it to their parents.  They all wore this hat and held my lovely wooden Christmas Tree.


{ENJOY}
We were lucky enough to have a visit from Pop from Melbourne for James birthday so that was very special for us as it's been 2.5 years since we have seen him.  We speak to him and Nanny on the phone every couple of weeks and the kids write letters but it was especially lovely having him here.  He is amazing with the kids and loves playing board games with them.


In October we had a few days away camping with our friends which you can read about here.  We love camping and it is so good for the kids.


Saturday, December 14, 2013

Apple Slice Recipe

This recipe comes from my Mother In Law who I have always admired as a cook.  I remember she whipped this up a few years ago when she was staying with us and it was just delicious and even though I've had the recipe I haven't actually made it, that is until last night.  It's actually a nice cold slice however you could warm it up I guess if you wanted to but served with a little bit of double cream for morning or afternoon tea you won't regret having a go at this one.


APPLE SLICE

INGREDIENTS
125 gms Butter
125 gms Castor Sugar
1 Egg
1/2 Cup of Desiccated Coconut
250 gms Self Raising Flour
1 Teaspoon of Vanilla Essence
1 Large 800 gms Can Pie Apple (or cook yourself)
300 gms of Sour Cream
3 Teaspoons Castor Sugar (Extra for topping)
1 Teaspoon Cinnamon (for topping)

METHOD
Turn Oven on to 180 degrees.

Line a slice tin with baking paper (parchment in the USA) and leave extra over the sides of the tin so that when the slice is cooked you can take the whole thing out easily.

Note:  I use the Jamie Oliver method of scrunching the baking paper up and put it under running water and then squeeze and/or shake the excess water off the paper.  This way you can easily put your piece of paper in the tin and it will sit where you put it vs. the stiff paper that comes out of the box.  I love this method.

STAGE 1 - MAKING THE BASE
Beat the butter and sugar together in a mixmaster until smooth.
Add egg into the butter/sugar mix and beat together.
Add the coconut and vanilla essence and mix.
Fold in SR Flour to the above mix.
Press this mixture into the lined slice tin (see above note). I just used my fingers to press it down in the tin and make sure it reached out to the sides.
Bake this in the preheated oven for 10 minutes only.

**** While the base is cooking****

Open your tin of pie apples (or you can use your own apples) and get a large knife and chop crosswise through the pieces while the apple is still in the tin.  I sliced it about 3-4 times and then turned the tin around and did it again.  What you get is small apple pieces for your slice without having to empty the tin and cut them individually.

Get your extra 3 teaspoons of castor sugar and 1 teaspoon of cinnamon in a little bowl and mix together with a teaspoon ready to be sprinkled on the slice.

**** 10 minutes has past now so get the base out of the oven ***

Your base should be a little cooked and soft but has also risen in the tin.  Carefully take the hot tray out of the oven and drop the slice tin on a board or something heatproof a couple of times until your base has sunk.  I only dropped it from a level about 6 or so cms or 1.5 inches.  It's just so the cake base sinks a little and you can then go and put your apple filling and topping on top.  We are not dropping it from a great height.

Take your tin of cut through pie apples and spread it out over the entire base of the slice.  Once you have got that looking nice and smooth and/or even, pour your Sour Cream on top of the slice and spread that out until smooth.

Topping Time - sprinkle the mix of sugar/cinnamon over the top of the entire slice and place back into the oven for a further 25 minutes.

Once out of the oven, I let the slice cool down after it was cooked and then I placed it into the fridge overnight and cut it this morning.  I did it this way because we were having morning tea today and as the slice had been in the fridge all night it's really easy to cut and tastes amazing.  

I served the slice on a plate with some double cream and a little cake fork is easy to eat it with.  Totally delicious and with a nice cuppa there is nothing better.  The slice is great just cold or room temperature.

Let me know if you make and what you think of it.

Friday, December 13, 2013

Presents from Canada

I was lucky enough to be the winner of a lovely "Crochet" book by leaving a comment on Julie's blog in Canada.  I never win things so I was in complete shock when I got an email from Julie a couple of weeks ago.  The package arrived while we were away at the beach so this afternoon we went to the Post Office to collect the parcel.  When we arrived home and opened the package, not only did the book arrive but a lovely card from Julie and various other wonderful gifts which the kids and I had fun opening.  I got to open the Crochet Book and the kids opened the rest of the little gifts between them.  Lovely stationery with a K on it, a yummy chocolate for me and no sharing with the kids and by the way it's been eaten now.  A lovely metal Christmas Tree Ornament and some lovely cupcake wrappers.  Julie, the gifts were lovely and it made our afternoon so I had to take a few photos to record the special gifts all the way from Canada.


Thursday, December 5, 2013

Learning how to Preserve

I've always loved courses not only because you learn new things, it's also a nice way to spend a day with a friend.  After Karin and I finished making soap recently we rang up and booked ourselves into a "preserving course" before the kids finish school for two months.

The course was run by "Green Living Australia" at Underwood which is just out towards Ikea way if you know the Brisbane area.  Green Living Australia is a family owned business that has been going for about 10 years.

Today we learnt the correct procedure how to cook and do water baths for Jams, Chutneys etc.  The classes are kept small ie. a maximum of 6 students however today it was just Karin and I so we got lots of hands on experience and thoroughly enjoyed learning this new to us skill.  It was a good day to do it in an air-conditioned room considering it was a hot 32 degrees in Brisbane today.
  
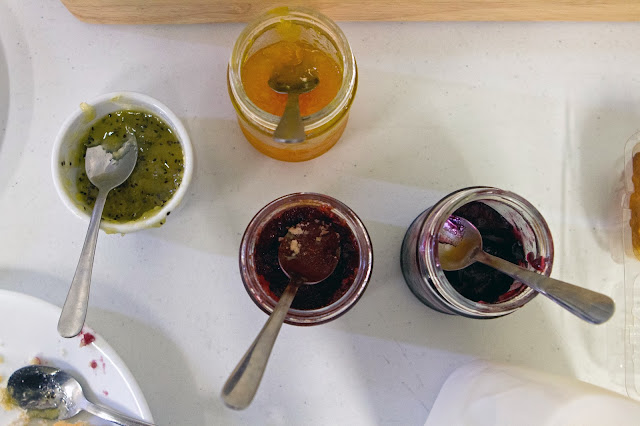
We made a Kiwi Lime Jam, then a Shiraz Wine Jelly and an Apple Chutney all of which went into the water baths.  Lastly we learned about Fermented Vegetables like Korean Kimci and German Sauerkraut and we made the Kimci.  I probably won't be making this type of food again as I'm not a big fan however will be making lots of the other things with my new preserving skills.  While we were there I picked up some extra soap making supplies to replenish my kit after making the first batch of soap.

Here's a few photos from our day and we are going to enroll in the "Cheese Making" course next year.  Even though there are instructions and video's on the internet on how to make cheese, I like to be taught in a class environment so Karin and I have put this on our "skills list" to learn in 2014.  At the end of the day we each got to take home a jar of everything we had made which was great.


Monday, December 2, 2013

The Veggie Garden and Home Made Focacia

This weekend Pop drove all the way from Melbourne to attend James 10th Birthday Lunch which was just a good opportunity to come and see the kids.  Pop has his own veggie garden in Melbourne and since we had neglected ours over the past few months which was growing lots weeds instead of veggies he and Sienna got stuck into all the wedding and planted new seeds.  While they were weeding, James was out at a birthday party of a school friend and I was inside making home made Lemonade, Anzac Biscuits and Rosemary and Sea Salt Focacia Bread.  Here's Sienna and Pop doing the gardening yesterday which was a huge job.  You can see lots of other photos of Pop and the kids here.